

Screen Printing With Embroidery Hoop

I am thrilled to share my latest obsession: screen-printing. It's fun, easy, and sooooo creative! I'm familiar with fabric paints, but never knew that bold, graphic, repeatable designs were something I could do at home with items I already had in my craft closet. Helloooooo gift giving!

There are other tutorials available, but I think I've improved upon the home-printing possibilities.
Some techniques recommend using pantyhose for screen fabric. I found they stretched too much and the spaces between fibers in the fabric were too large, creating messy-looking images.
Some folks found success using white glue on their screens. For me, decoupage medium is sturdier, more reliable, and holds up to repeated screenings and cleanings.
As for creating the mask, most suggest tracing the image onto fabric, then hand-paint decoupage medium outside the lines. For me, this method was imprecise and very time consuming. What I've come up with is faster, easier and creates a better, sharper design. This allows me time to make lots of screens and many prints!
Here's what you'll need:
Embroidery hoops
Sheer woven fabric – organza, voile
Decoupage medium – Mod Podge, etc.
Clip art images – silhouettes, bold shapes, etc.
Full-sheet stickers – available at office supply stores
Scissors, large punches or Sizzix/Cricut cutter
Screen printing ink made for Fabric
Expired gift card or credit card
Foam brushes
Small paint brushes
Paper plates
Heavy paper or cardboard
Items to print on – onesies, t-shirts, dish towels, aprons, totes
Pull organza fabric over the smaller of your embroidery hoops, and secure with the larger. Once in place, adjust and pull until fabric is taut. Make sure there are no wrinkles or gaps in the fabric.
Choose your print design. Simple outlines, bold shapes with minimal detail work best. Here are some silhouette designs (from my Cameo blog).
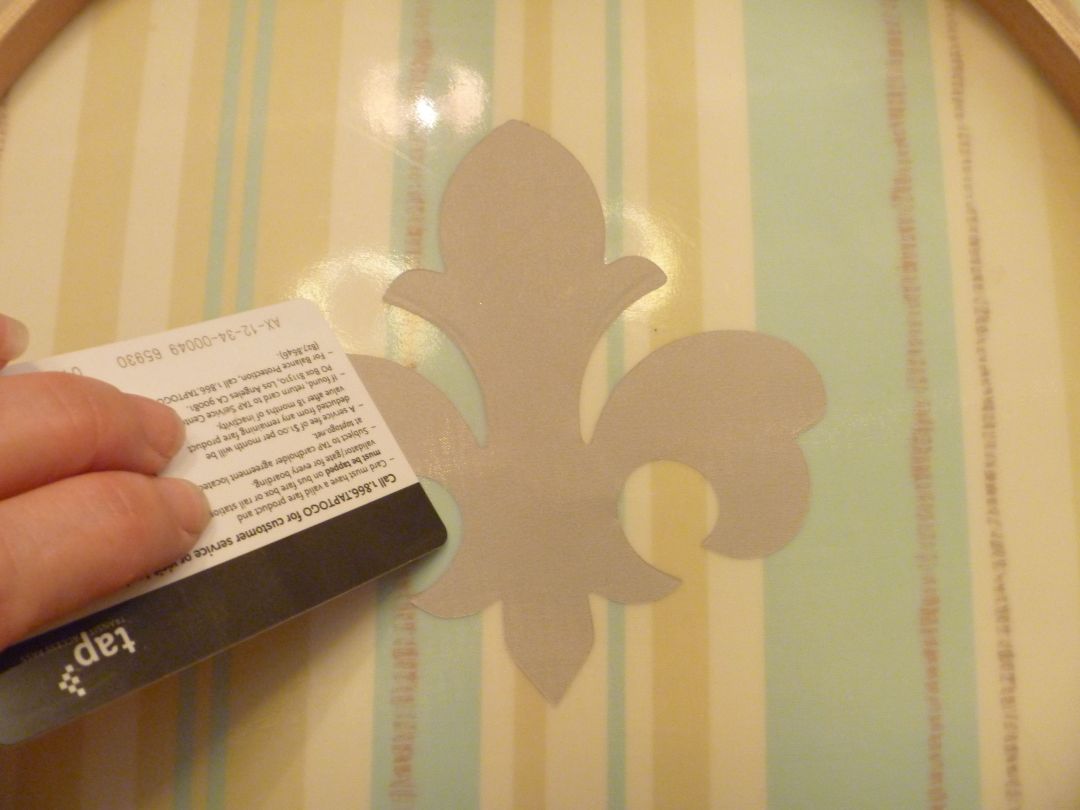
Print designs on the sticker paper and cut out with scissors, or use a Sizzix/Cricut, etc. to cut out shapes. (My fleur de lis is from my Sizzix.) If you're using letters or something that has a 'right' and a 'wrong' direction, make sure that designs are printed in mirror-image as they're being apply to the underside of the hoop.
On the 'flush' or 'drum' side of the fabric, apply your sticker. Turn over the hoop and fabric, and burnish the underside of the sticker with a credit card to make sure the sticker is … stuck.
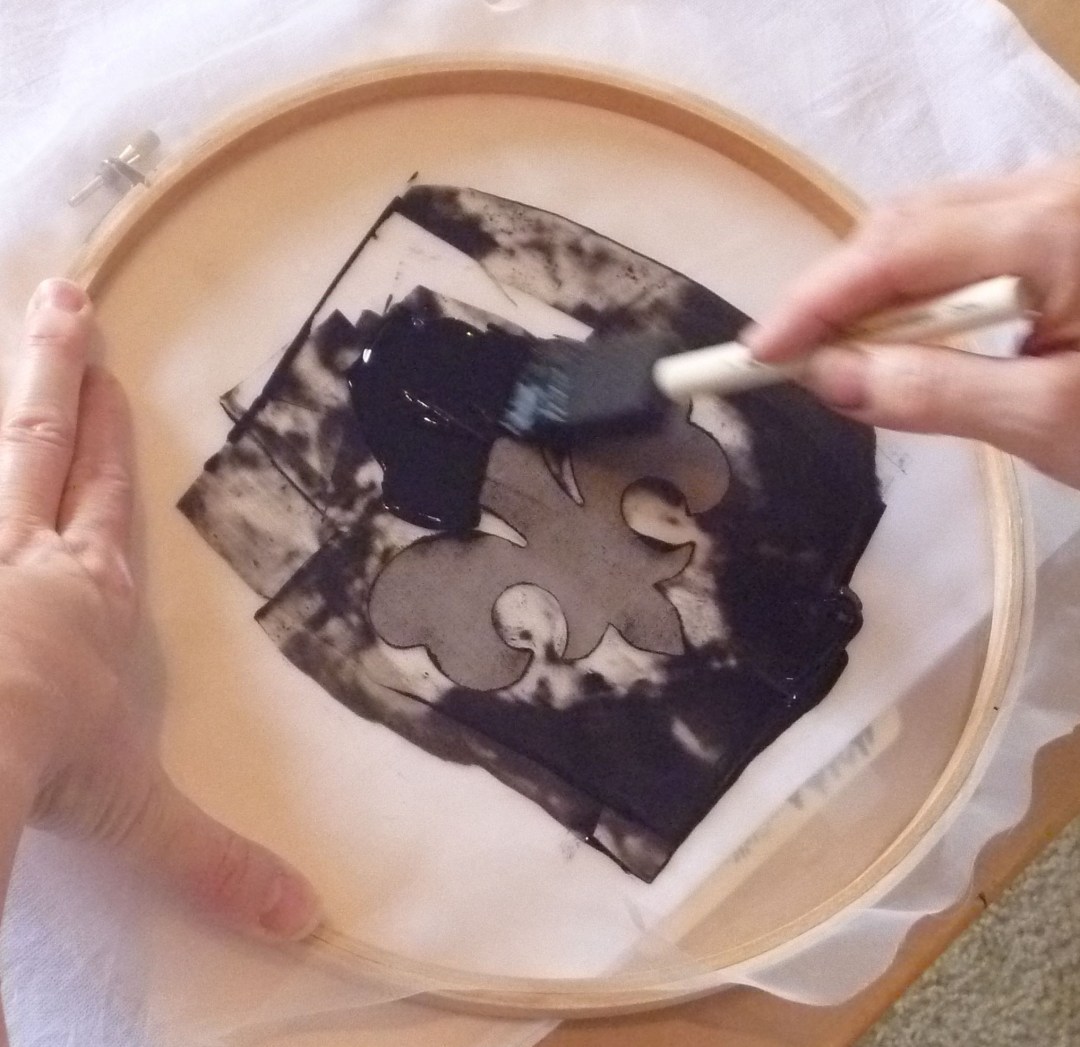
Turn over the hoop and with a foam brush, apply decoupage sealer to the fabric on flush side of the hoop. At this point you can use one of two methods:
-Apply a thick coat of decoupage sealer. This is an easy method, but drying will take several hours – and in some cases overnight. My latest batch took nearly 8 hours to dry, so plan accordingly.
-Alternatively, you can apply two thinner coats of decoupage medium, letting the first coat dry at least 30 minutes before adding the second. This method will dry faster, but requires more attention.


When painting on the sealer, make sure it coats the edges of the sticker completely. If not, your image will have bumpy edges. Carefully turn over the hoop and check the underside to make sure there are no holes or voids in the fabric where you don't want them.

Lay the hoops flat to dry. Do not prop the hoops vertically … the decoupage glue will run! (I learned that the hard way.)

When the decoupage medium is dry, carefully remove the sticker. You may have to pick a bit at the stubborn edges. Once most of the sticker is removed, run the screen under water to help rub away and remove the extra bits.


What you've created is called a "mortise mask." That's a big fancy word for a cover that leaves your 'subject' area exposed, and the area around, masked.
After the sticker is removed, you can begin printing!
Place a piece of cardboard under the item you're printing (or inside, if a t-shirt), to keep the ink from bleeding through. Place the hoop flush-side-down on top of shirt.

I used the tag to help me position the screen.
Hold the screen in place with one hand. With a foam brush, dab ink into the voids in the mask.
Using the credit card, scrape off the excess.


Carefully lift the screen off, and look at your beautiful work! If there are any spots that got missed by the screen, use a small paint brush to fill in.


Follow manufacturers instructions for heat setting your image – usually you just have to pop the t-shirt in the dryer for a bit, or iron for 3 to 5 minutes.
Once used, you can get many images from one hoop-screen.

TIPS:
For the screens, you'll need fabric. You can get new pieces from the fabric store, but here's a great tip: Use old sheer curtain panels! They're pretty easy to find at thrift stores, and a terrific way to upcycle.
I sometimes test my screen on a piece of scrap paper to make sure there aren't any undesirable holes in the mask. If you do find some, cover with tape, and begin printing. If you want to reuse your screen, reapply another coat of decoupage medium to the unwanted voids in the screen. Let dry completely before printing.

Screens can be washed and re-used if rinsed quickly and carefully. Don't let them sit more than 5 minutes with ink on them, or you'll be too late. Also, take care not to wash away the decoupage glue. Rinse, rub lightly with fingers to remove ink, and let dry.

Tips on silhouette clip art:
You can find them all over!
I found this dinosaur one here:
http://www.arthursclipart.org/dinosaurs/dinosaurs/page_05.htm
Folks sell beautiful ones on etsy – just search for silhouette clip art.
www.etsy.com
Search online for silhouette 'vectors' and you'll find zillions.

Enjoy your art! And remember, it's supposed to look hand-made. Little rough edges add to your piece's personality!
Screen Printing With Embroidery Hoop
Source: https://tamaracentral.com/2013/06/06/diy-small-batch-screen-printing-tutorial-using-embroidery-hoops/
Posted by: gomezmosion88.blogspot.com
0 Response to "Screen Printing With Embroidery Hoop"
Post a Comment