

how to paint a seascape step by step
2 Brilliant Tips to Use With Every Painting Project
Paint mixers that you can chuck in a drill are nothing new, but I didn't have one on hand for a recent touchup and needed to improvise.
 Family Handyman
Paint mixers that you can chuck in a drill are nothing new, but I didn't have one on hand for a recent touchup and needed to improvise. So I found a whisk in one of my kitchen drawers, cut off the loop on the end of the handle, and chucked it in my cordless drill. It happened to be the right size for a 1-gallon paint can and did a great job of mixing the old paint. — Rosie Wallent
 Family Handyman
Instead of buying liners for my plastic paint roller tray, I just let the paint dry and pour new paint right over it for the next job. When the paint starts getting thick, I peel it out and throw it in the trash. I've had this tray forever and probably won't ever need to buy another one. — Travis Larson
Paint a Room Without Making a Mess!
Plus: 11 little-known painting hacks from our expert field editors:
 Family Handyman Family Handyman
Family Handyman
No More Splashy Paint Can Lids
Ever hammer down a paint can lid only to have paint splatter everywhere? You can prevent that by grabbing a 5-in-1 tool and using the pointy end to punch a few holes through the groove of the can's rim (be sure to rotate the tool left and right a little to widen the holes). The holes allow excess paint to drain back into the can. The lid will cover the holes and make an airtight seal. If you don't have a 5-in-1 tool handy, you can punch some holes with a hammer and nail. — Larry Gusman
 Family Handyman
Preserve a Brush With a Glove
I like to wear disposable nitrile gloves when I'm painting. They not only keep my hands clean but also keep my brush from drying out whenever I take a break. I simply grab the bristles with my gloved hand and then pull the glove over the wet bristles. A twist tie around the handle keeps the air out. — Ned Webb
 Family Handyman
A Push Broom Handle Reaches New Heights
You can spend $10 to $70 on an adjustable extension pole for rolling paint in high places. But if adjustability isn't important or you just want to save a few bucks, try a push broom handle. Most fit perfectly on a paint roller. — Dave Moran. Long handles are also great for yard tools. Check out these 23 yard tool hacks.
 Family Handyman
Slap It On, Then Smooth It Out
When painting trim or other woodwork with a brush, I've found it's best to load my brush with paint and then lay it on heavily in small sections using short, quick strokes—just to get enough paint on the trim to work with. I then blend the paint into the section I painted before and smooth it all out using long finishing strokes in one direction. Greg Scholl
 Family Handyman
Brush Bristle Saver
Without something to hold them in place, paintbrush bristles will curl or splay as they dry. The best way to store them is in the cardboard wrappers that they came in. They're not just packaging; they maintain the shape of the bristles as the brush dries after cleaning. If you've already thrown your brush wrappers away, use paper and a rubber band instead. — Andy Benke. These 13 zip tie hacks will seriously make your life better.
 Family Handyman
Cardboard Protects Floors Best
I don't like drop cloths. They're usually too big, slippery, clumsy and just downright messy—especially when I need to move them around while they're still covered in wet paint. That's why I prefer cardboard. I set it tight to the wall and slide it with my foot as I work my way around the room. Beckie Boggs
 Family Handyman
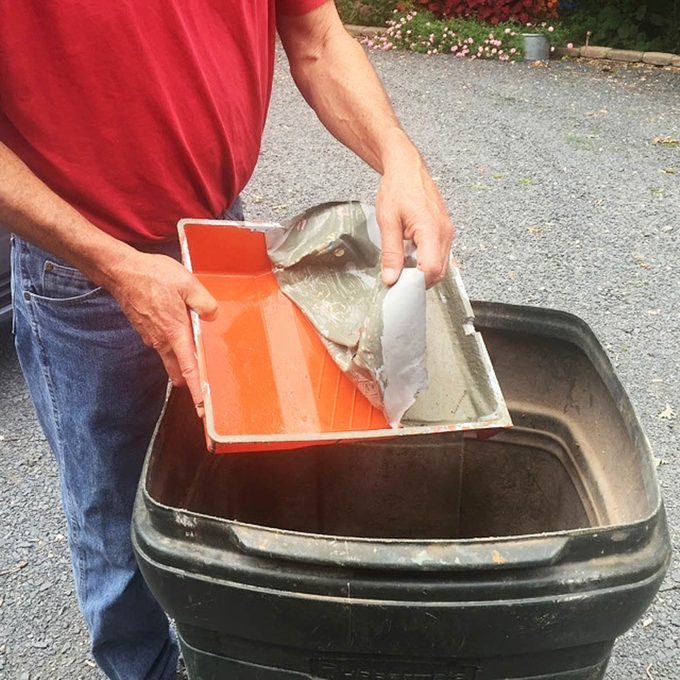
No-Maintenance Paint Tray
Don't bother cleaning or putting liners in your paint trays. Just pour any excess paint back into the can and let the paint in the tray dry completely before using it again. I have paint trays with a 1/8-in.-thick paint buildup in them. I like them better than clean trays because they're a little heavier and don't slide around when I'm loading the roller. Mac Wentz
 Family Handyman
2/3 Prep, 1/3 Painting
A good prep job often takes more time than painting, but it pays off. The more time you spend prepping a room for new paint, the better your finished paint job will look. Washing, patching, sanding and vacuuming walls, ceilings, trim and doors before you pick up a brush or roller are time well spent. If you don't take care of small imperfections now, they'll stick out like a sore thumb once the paint goes on. Arthur Barfield
 Family Handyman
Do the Ceiling, Then the Walls
Before painting any walls, take a good look at your ceiling. If you think it needs refreshing, paint it first. You don't want to paint the walls and then—in a couple of weeks or years—do the ceiling. Rolling the ceiling drops a fine mist of paint onto everything below. Painting the ceiling first also allows you to be less fussy along walls. Any paint that gets slopped onto walls will get covered up later when you paint them. — Patrick Morrissey Check out these handy hints for painting a ceiling, too, before starting.
 Family Handyman
Skip Brush Cleaning Between Coats
Whenever I take a break from painting or if I'm done for the day, I toss my brushes into a 5-gallon bucket of clean water to keep them from drying out (make sure all the brushes have the same color paint on them). Then, when I'm ready to start painting again, I swish the brushes around in the water and spin the excess out with a paintbrush-and-roller spinner. Do the spinning inside a second empty bucket to protect surrounding walls from flying water drops. Ann Wisnoski
 Family Handyman
An Egg-Cellent Painting Tip
Whenever I need to paint something small like a picture frame and want to raise it off the table a bit to paint the edges, I break out these handy egg cartons. I just cut a couple in half and use them to support the frame's edges. I can reuse them several times or just throw them away when I'm done. — Nancy Luptowski
Originally Published: July 25, 2018
Sign up for DIY projects sent right to your inbox
Complete DIY projects like a pro! Sign up for our newsletter!

Subscribe & SAVE 1 Year Subscription
for only $10!
how to paint a seascape step by step
Source: https://www.familyhandyman.com/article/2-brilliant-tips-to-use-with-every-painting-project/
Posted by: gomezmosion88.blogspot.com
0 Response to "how to paint a seascape step by step"
Post a Comment